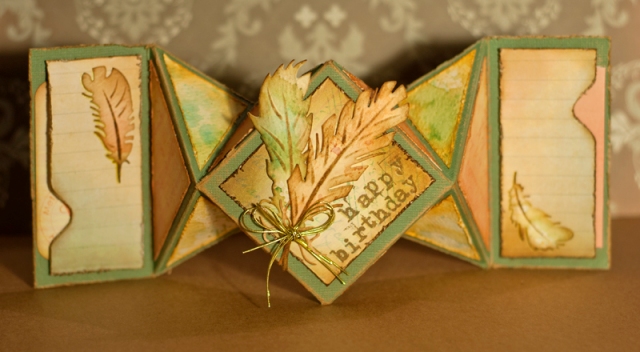
It is my mom’s birthday today (Happy birthday Ma!) and I made this card for her on the weekend. She loves soft colors, vintage touches and all things with birds, so I decided to match some watercolor inking with feathers in shades of sea-green, dirty pink and added accents of gold.
The tutorial is also part of my submission for the final round of the Scrap-a-Doodles 2014 Design Team Audition.
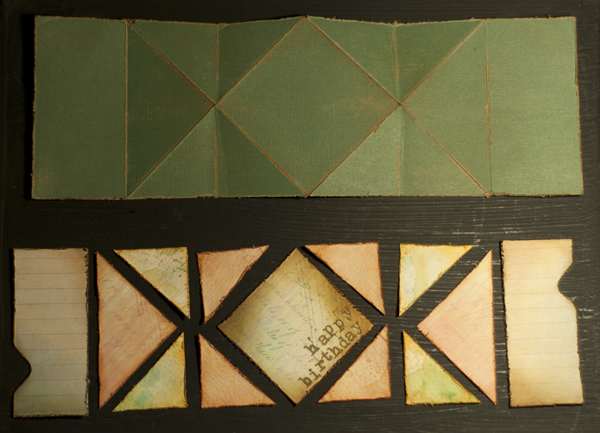
The tutorial shows that the diamond fold used in this card might look complicated, but it is actually straight forward to do and it has great impact. The card can also easily stand on its own when opened.
Creating the card base
Step 1:
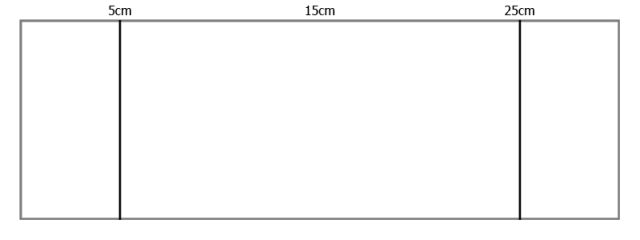
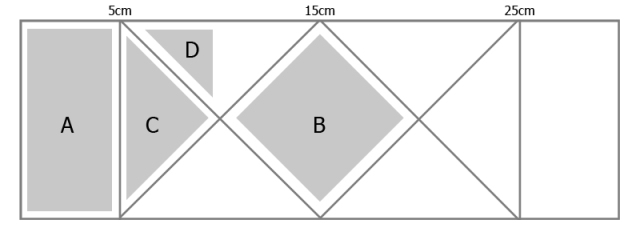
Cut card base from Core’dinations Kraft Core card stock to 10 x 30 cm (you can make 3 diamond cards from one 12×12 sheet).
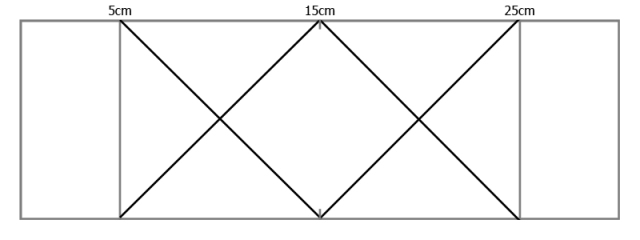
With the wrong side of the card facing up, score the card stock at 5cm and 25 cm on your scoring board. Flip card stock over.
 Step 2:
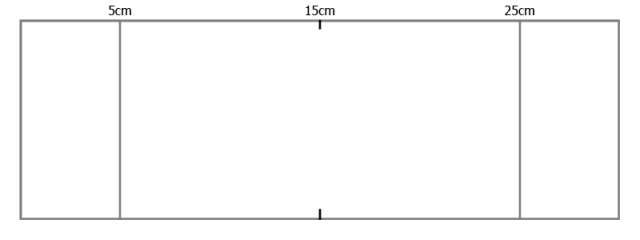
With the right side of the card stock facing up, mark the 15cm mark with a pencil at the top and bottom.
 Step 3:
Score the diagonal lines (45 degrees) by matching the pencil marks with the end of each of the first scorelines. I use a ruler to hold down the card stock and keep the points aligned. Repeat for all 4 diagonal lines.
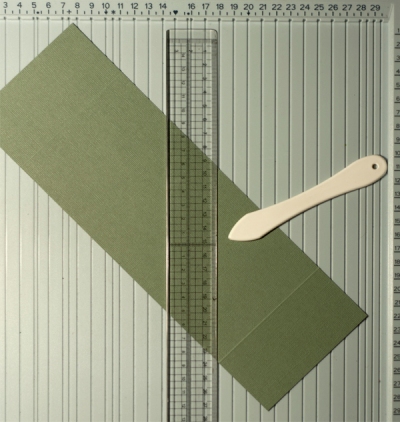
Here the line to be scored is aligned with the right side of the ruler with the pencil mark at the top and the first score-line at the bottom
 Erase pencil marks once all lines are scored.
Fold each scoreline and crease well.
Step 4:
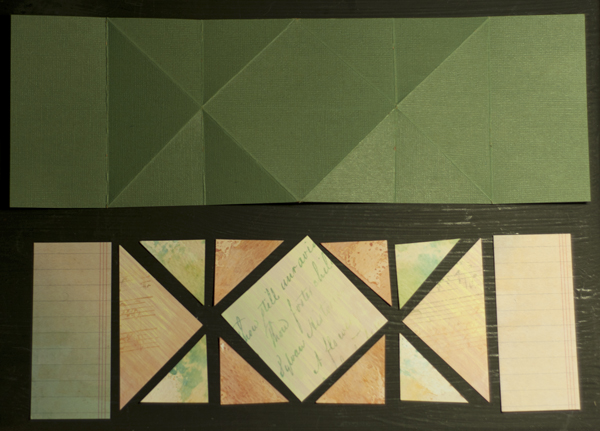
Placing the card stock face down, bring the 5cm scoreline towards the center of the diamond, matching the top and bottom points of the diamond. You might need to ‘encourage’ the 2 side triangle pieces to fold inward using your fingers while bringing in the 5cm scoreline. Fold down and crease well. Repeat on the other side, lining up the 2 rectangles. From the back you will now have a square.

Click on the animation to see a larger version
Creating the watercolor paper
Cut 1 A5 piece of watercolor paper in half, creating 2 A6 pieces. Rub Distress Inks onto craft sheet in area large enough to cover watercolor paper (see colors used below). Spray with water until droplets form. ‘Smoosh’ card stock into inked area moving it around slightly. Dry using heat tool. Return dry watercolor paper to craft sheet, this time ‘pounce’ into remaining ink droplets. Dry again. Repeat pouncing if desired or add more ink and repeat if it seems too light after drying.
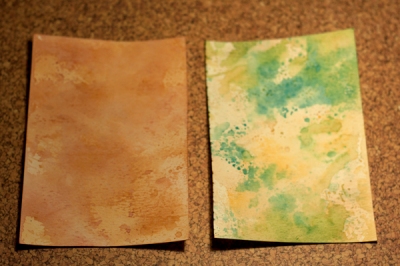
Watercolor paper with distress inks. Left piece – Tea dye and Victorian Velvet. Right piece – Antique Linen, Broken China and Scattered Straw
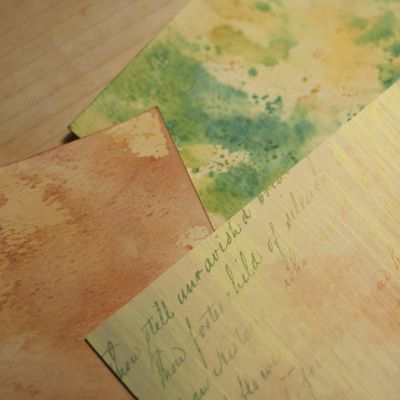
Try to match your pattern papers’ colors – the pattern paper I used comes from Home Stuff in Randburg – there was no indication of the brand (they were sold in unmarked clear plastic sachets)
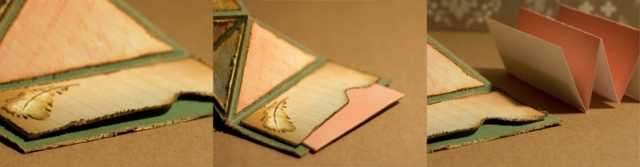
Cut matting pieces
 You will need to cut the following pieces to cover each section of the card:
Piece A – 9cm x 4cm rectangle (cut 2 from pattern paper)
Piece B – 6 x 6 cm square (cut 1 from pattern paper)
Piece C – 6 x 6 cm square (cut 1 from pattern paper and cut in half on the diagonal to create 2 triangles)
Piece D – 5.7 x 5.7 cm square (cut 2 from your watercolor paper, 1 from each color. Cut each square in half on the diagonal to form 4 triangles and cut each triangle in half again to form 8 small triangles, 4 of each color.
Here is the basic layout of cut pieces before any distressing:
Preparing the feathers
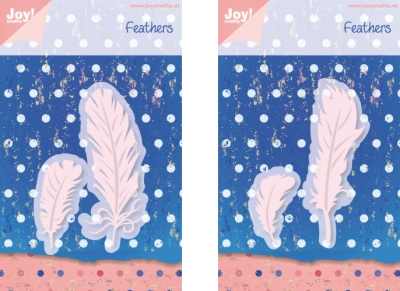
Joy!Crafts Cutting and Embossing Dies – 6002/0292 (left) and 6002/0293 (right)
The feathers are cut using Joy!Crafts Cutting and Embossing Dies 6002/0292 and 6002/0293.
Die cut 2 of the feathers (one large and one small) on each of your watercolor papers. If you work very sparingly with the die-cutting (and the matting pieces) you should be able to make 2 cards from your 2 pieces of watercolor paper.
Because these are cutting AND embossing dies, leave the die-cut in the die once cut and pass through your machine again using the embossing rubber mat, this gives great detail to the feathers. You can add more detail by using this technique.
Ink edges of the feathers using Gathered Twigs distress ink.
For more dimension, shape the 2 big feathers with a large ended embossing stylus (about 8mm) on an embossing mat, curving them slightly from the back. Use a small (2mm) embossing stylus to accentuate the vein of the feather (also from the back).
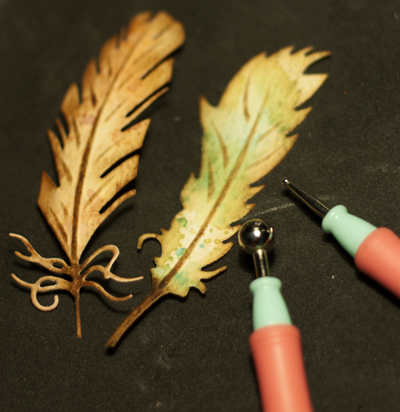
Shaping the feathers – before (right) and after (left)
Distressing, inking, sanding and stamping
Distress you card base using a paper distresser tool and some sandpaper. The craft core shows distressing very well. Ink the edges lightly (unevenly) using Gathered Twigs distress ink.
Distress all the matting pieces with the paper distresser and ink edges with co-coordinating distress ink (I used Gathered Twigs, Tea Dye and Scattered Straw).
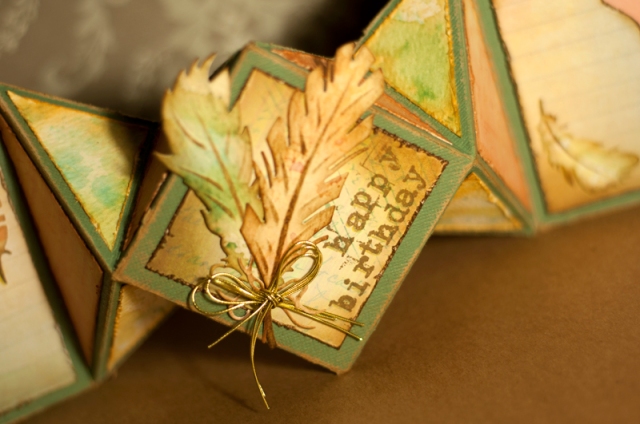
Stamp sentiment on middle matting piece (after distressing) using Walnut Stain distress ink. I used the lowercase typewriter stamp set from Typo.
Here is the basic layout after distressing, inking and stamping:
Assembling the card
Adhere the middle matting piece and all the triangle pieces to the card base (not the 2 rectangular side panels yet), keeping the spacing equal in each section. to ensure that the small points of the triangles stay flat onto the card base, I adhered everything with liquid glue (I like Tombow Multi Liquid Glue).
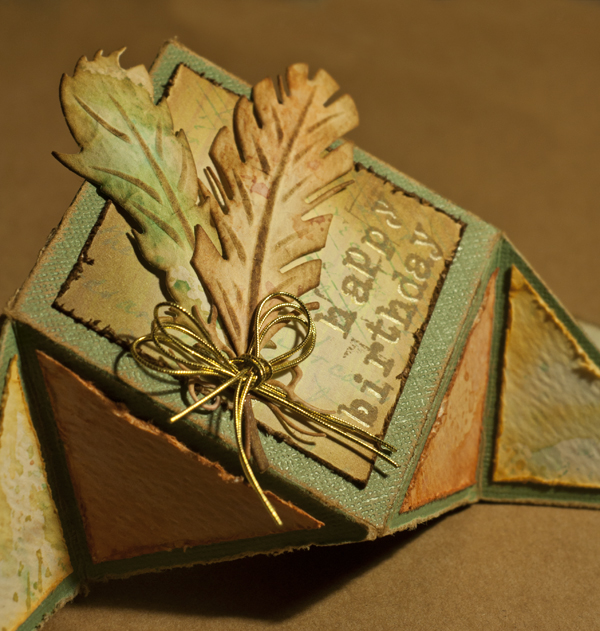
Adhere the 2 large feathers onto the front of the card, lifting the tops with dimensional foam adhesive.
Creating space for your message
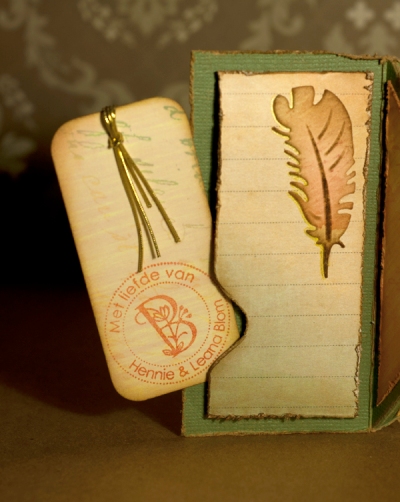
Due to the open nature of this card, there is not a lot of space to write your personal message. To add space for a message punch the 2 side pieces using the We R Memory Keepers – Envelope Punch Board, aligning the edge of the piece with the 1 inch mark. Distress and ink the punched areas (as in above image).
Adhere the pieces to the card base using dimensional foam adhesive on 3 sides leaving the outermost side open for your little note. Fold your note small enough to fit into the pocket you just created.
Do the same for the left hand side. You can include a second note or just a little tag like I did (the stamp was custom made for our wedding, I love adding it onto cards that are for our friends and family).
Adhere the small feathers onto the side panels.
Adding details
Make a bow using 3 strands of gold twine. Glue the center of the bow with liquid glue and allow to dry. Once dry, adhere bow onto front of card.
Create a ‘shadow’ on the stamped sentiment and for the small feathers using a gold gel pen.
Envelope
Create envelope using the We R Memory Keepers – Envelope Punch Board using matching pattern paper that is cut down to 17.5 x 17.5cm.
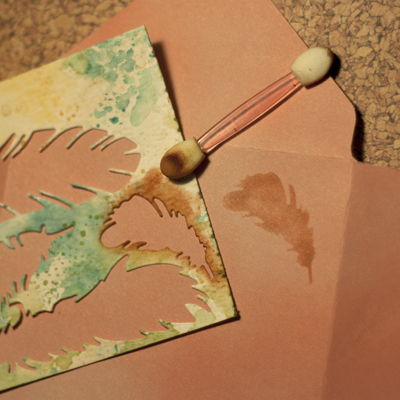
Using the remnants from die-cutting the feathers as a stencil, ink a small feather onto the envelope with a small foam applicator using Tea Dye distress ink.
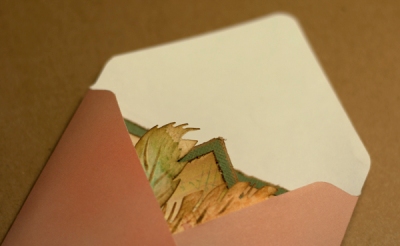
Assemble the envelope with double sided tape.
The card will be quite thick, but will still fit into the envelope.
A long post, but if you have all your supplies ready, you could make this card in an evening.
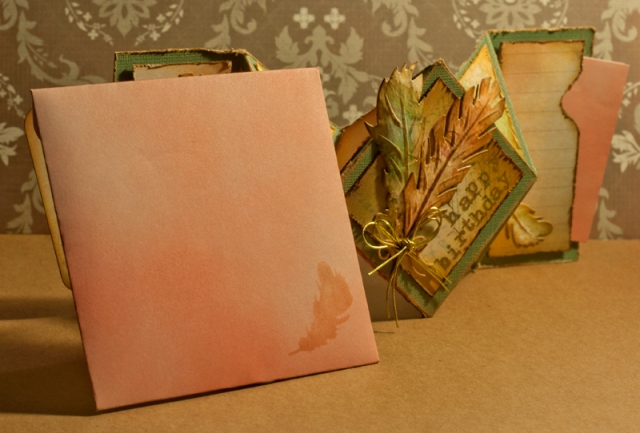
The final product
We visited my parents yesterday and my mom was delighted with the card! It found a lovely spot on the piano in the dining room.
 I purchased all the paper and the envelopes from Something Blue in Irene and laser printed the designs.


