As I mentioned in this post, I created the following tutorial for anyone who would like to use the ribbon binding technique that I used for my sister-in-law’s wedding invitations.
The tutorial is also part of my submission for the final round of the Scrap-a-Doodles 2014 Design Team Audition. I thought it would be quite fitting to share this tutorial as my entry for the Something Blue DT as I purchased the paper and envelopes for her invitations from Something Blue.


Closeup of the bow and the binding – the ribbon really creates a ‘spiral bound’ look
Design and dimensions
I designed the invitation to be economical (in terms of printing and paper) and the dimensions used allowed me to print 3 copies on each page of card stock (both the A4 and Letter size papers). The invitation also fits neatly into a DL sized envelope.
The filigree/curl design was incorporated on all pages on exactly the same position for continuity. The pages increase in size to create a staggered effect with 3mm ‘steps’.
I also rounded the bottom 2 corners of each page for a professional finish. You could use the We R Memory Keepers Corner Chomper or a similar tool.
Page 1
Color laser printed on A4 Translucent Vellum Paper from Something Blue.
Dimensions: 19cm x 8.6cm

Page 1 – The translucency of the vellum shows just a hint of the photo below. It has great shine.
Page 2
Professional photo print. I used WetINK in Pretoria, but most photo printing shops should be able to do this for you.
Dimensions: 19cm x 8.9cm

Page 2 – The couple dressed in purple for the shoot to compliment the colors of the invitation
Page 3
Color laser printed on 120gsm Letter Petallics Paper in Alpine Aster from Something Blue.
Dimensions: 19cm x 9.2cm

Page 3 – The invitation wording with a special quote
Page 4
Color laser printed on 300gsm A4 Curious Metallic Paper in Galvanized from Something Blue.
Dimensions: 19cm x 9.5cm

Page 4 – Additional details such as accommodation options. This page is printed on 300gsm card stock to create a sturdy backing for the booklet. Just look at the shine!
Holes and ribbon
To punch the holes I used a Manual Comb Binding Machine (the kind used with plastic ring binders). I got some help from my husband to punch the card stock through all 4 layers at once. It definitely is a two-person job – I held the cards aligned and flush with the machine while he pressed down on the handle, punching the holes.

The ribbon used is 6mm organza ribbon with a silver thread on each side, adding just the right amount of glamor. You will need a 41cm long piece for the dimensions of this invitation.

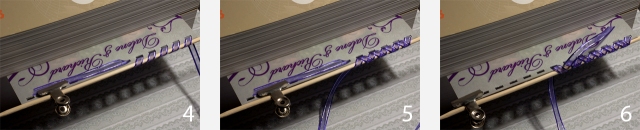
Threading the ribbon
(Click on the photos for a larger version)
- Clamp punched pages with all holes lined up between two heavy books (in our house you need only look for the nearest auditing or engineering textbook). We will work ‘upside down’ for the threading.
- Clamp a bamboo skewer to the free hanging edge of the invitation with two metal clips. Pull ribbon through the first hole to the left of the center and clamp in in the right metal clip with a tail of about 11cm.
- Start threading the loose end of the ribbon through the holes, pulling the ribbon taught (but not too tight) around the skewer.

- When you reach the left clip, the skewer should be fastened enough so that you can remove the clip.
- Continue threading to the right end of the invite and start threading back again, starting from the second most right hole.
- When you reach the middle and the ‘tail’, unclip the tail and thread over it.
- To keep the ‘tail’ out of your way, clip it to the right end.
- Continue threading the the loose end of the ribbon, removing the left clip when you reach it.
- When you reach the left end of the invite start threading back again, starting from the second most right hole up to the middle. Unclip the ‘tail’.
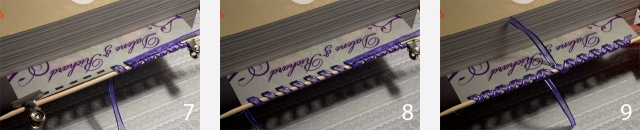
- Both ends should be about the same length at this stage.
- Tie a bow with the two ends, fiddling until you are satisfied with the look of the bow. Cut ends into slanted points if desired.
- Remove the bamboo skewer by sliding it out to one side gently.
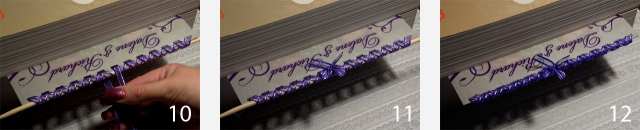


Remember to tuck in the ends of the bow before closing the envelope.

It seems like a long process, but if you do all your steps in an assembly line fashion, you can quickly make a lot of these – I made 80 (with some help)!


